Editorial responsibility for this article rests with Wuhan Ooi Photoelectric Technology Co., Ltd. Written and reviewed by the Ooitech editorial team. See our editorial policy for how we write, where AI tools are used, and how to request a correction.
UV Adhesive on a 0BB Line: Dispensing, Specs and Cost
Table of Contents
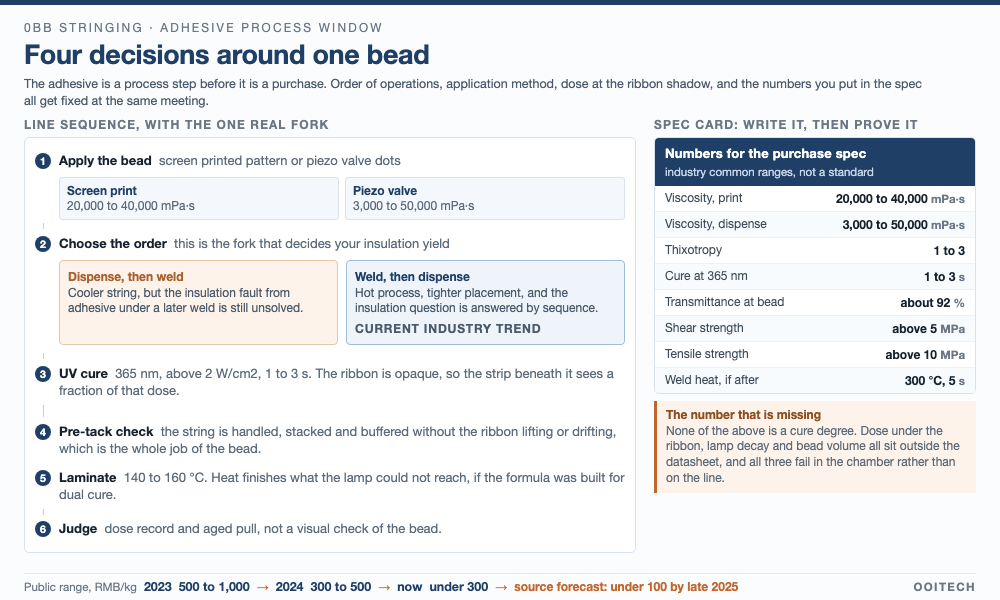
Quick answer: The adhesive is a process step before it is a purchase. On a 0BB line you first decide whether the bead goes down as a printed pattern or as piezo valve dots, then whether it lands before or after the weld. Dispensing first keeps the string cool and leaves an insulation fault that the industry has not solved, so most public routes now weld first and dispense second. Neither order removes the ribbon shadow, because the strip hides the adhesive directly under it, which is why UV plus thermal dual cure keeps appearing in supplier catalogs. The numbers that settle a purchase are a viscosity band matched to the method, thixotropy around 1 to 3, roughly 1 to 3 seconds under more than 2 W/cm2 of 365 nm light, about 92 percent transmittance at bead thickness, shear above 5 MPa and tensile above 10 MPa. Put a test method beside every one of them.
A 0BB string leaves the stringer held by adhesive, not by solder alone. One material choice then becomes four line decisions: how the bead is applied, when it is applied, how much light reaches it, and which number proves it cured.
The bead is a process step before it is a purchase. Six steps, one fork, and eight numbers that belong in the purchase spec rather than the marketing sheet.
The ribbon got thin enough to need glue
In an MBB or SMBB module the ribbon lands on a busbar pad, and the solder joint doubles as the fixture. Take the busbar away and the ribbon sits on fingers only, so something else has to hold it. The geometry explains why the material arrived at all: conventional MBB ribbon is generally 0.26 mm or more in diameter, and 0BB ribbon is already below 0.2 mm. A ribbon that thin will not stay on a cell on welding force alone, and it lifts or drifts somewhere between the stringer and the laminator. A bead of adhesive fixes it where it lies, then cures in seconds, which is the entire reason a bottle of liquid sits next to a stringer. Removing the busbar changes far more than the print pattern, and the ribbon is the first thing to notice.
The supply side moved faster than the process did. In the first half of 2023 only about a dozen adhesive makers had entered PV, mostly traditional formulators such as Henkel and Darbond. By February 2025 the count of companies developing or already producing PV UV adhesive had reached 40 to 50.
Thin ribbon is its own problem, and how PV ribbon is drawn, annealed and tinned sets the tolerance the bead has to hold.
Two ways to put the bead down
Application method is not a preference: it sets the rheology you are allowed to buy, and the two methods only partly overlap. Screen printing lays a pattern in one pass and wants a stiffer paste, while piezo valve dispensing writes the bead dot by dot and tolerates a much wider viscosity band.
| Method | Viscosity band | How the bead is formed | Why a line picks it |
|---|---|---|---|
| Screen printing | 20,000 to 40,000 mPa·s | Whole pattern in a single pass | Takt and repeatability once the screen is stable |
| Piezo valve dispensing | 3,000 to 50,000 mPa·s | Dot by dot, sub-millimeter placement | Placement freedom and a wide viscosity window |
Both bands are industry common figures from the source, not values from a test standard. Printing is the newer entry and it arrived for takt: a printed pattern beats a nozzle visiting every point, and it repeats better once the screen and the paste are matched. It does not change the shadow, which belongs to the ribbon rather than to the tool.
Whichever method you run, the dot has to stay put. Adhesive that bleeds onto a finger raises contact resistance, and that is one usual source of EL dark spots on a dispensing route. Thixotropy governs it, and it is where most spec sheets go quiet.
Dispense first or weld first
The order of operations decides your insulation yield, so it is the first fork, not the last. The early routes dispensed first and welded afterwards, which kept the string cool and kept adhesive out of the weld. The insulation fault that comes from placing adhesive before the weld was never really solved, and the trend has turned the other way: weld, then dispense.
| 0BB route | What the adhesive does | What the choice costs |
|---|---|---|
| Dot dispensing only | Positions the ribbon between fingers; the low temperature alloy coating alloys with the fingers during lamination | No high temperature step and a simple flow, but public reports keep returning to ribbon to cell adhesion and reliability |
| Weld, then dispense | The weld makes the electrical joint, the bead only reinforces it | Closest to existing SMBB, and equipment can be upgraded; hot process with tight placement accuracy |
| Film IFC | A carrier or skin film presses the ribbon down, and alloying happens at lamination | No liquid adhesive, added film cost, and the ribbon can be thinner |
Route choice is not settled. HJT moved first because a low temperature process and a silver reduction target both point at 0BB, and TOPCon is following. Public plans disagree with each other: JinkoSolar and Huasun describe weld plus dispense, Chint runs a film route on ZBB, and IFC film is reported to be in volume use on BC, HJT and TOPCon.
That disagreement is the biggest variable in demand: a film route uses no liquid adhesive at all.
What the spec sheet should actually say
A spec written from a datasheet lists every property and tests none of them. Eight entries cover a 0BB line, and each one needs a method beside it rather than a certificate.
| Property | Figure used on the line | How to check it |
|---|---|---|
| Viscosity, printing | 20,000 to 40,000 mPa·s | Rotational viscometer at the shear rate your screen sees |
| Viscosity, dispensing | 3,000 to 50,000 mPa·s | Same instrument, at the shear rate of your valve |
| Thixotropy | 1 to 3 | Ratio of low to high shear viscosity, matched to the band above |
| Cure | 1 to 3 s under 365 nm at more than 2 W/cm2 | Radiometer in the bead plane, not at the lamp window |
| Transmittance | about 92 % at bead thickness | Spectrophotometer on a cured film of your thickness |
| Shear and tensile | above 5 MPa, above 10 MPa | Lap shear and dog bone, before and after aging |
| Weld heat | 300 °C for 5 s, only if welding follows | Reflow stage, then a pull test at the joint |
| Reliability | UV60, TC200, DH1000, HF10 | Full module sequence, not coupons |
All eight entries are industry common ranges from the source review, not clauses in a standard, so the method column is yours to write.
Viscosity and thixotropy are one decision
A viscosity figure alone tells you little: both properties have to match the same tool. A paste too low in thixotropy flows sideways and reaches the fingers. Too high and it stacks vertically, so the bead measures thicker than the gap it has to fill. The working range quoted across the industry is 1 to 3, and it only means something next to the viscosity band of your method.
The two strength numbers, and the 300 °C question
Shear above 5 MPa and tensile above 10 MPa are the floor: the bead protects the joint and survives as a material at the same time. Adhesion has to work on both sides, to the silicon and to the tin lead alloy of the ribbon, and matching a welded joint pull under the same conditions is the best case, not the entry requirement.
In our mechanical screening, we test joint adhesion on both silicon and tin lead surfaces, verifying that each batch achieves at least 5 MPa in shear and 10 MPa in tensile strength before line release.
The 300 °C for 5 s figure only applies if the weld comes after the adhesive. If you weld first, the requirement changes shape: the bead has to sit at hotspot temperature for a long time without failing as a material. Same bottle, two different tests, and asking for heat resistance without saying which order you run returns the wrong data.
Reliability is the acceptance test
A cured bead also has to keep its chemistry quiet. It must not react with EVA or POE or any of their additives, and the only honest check is a laminated coupon rather than a cured disc. Failures here show up along the ribbon rows, the pattern described in line shaped bubbles and delamination along cell ribbons. The four tests quoted for the material are UV60 for ultraviolet aging, TC200 for thermal cycling, DH1000 for damp heat and HF10 for humidity freeze, and they are the minimum rather than the ceiling.
The shadow under the ribbon
The ribbon is opaque. Adhesive directly beneath it sees a fraction of the light reaching the bead beside it, and that hidden strip carries load. This is the most useful thing to know before writing a cure spec: the number on the lamp is not the number at the joint.
Two answers exist, and they combine. One is dual cure chemistry, where the exposed part sets under UV and the shaded part finishes on laminate heat, which runs at 140 to 160 °C. The other is to stop pretending the lamp is the only energy source and to verify the joint after lamination rather than before it. Both shift the acceptance point downstream, which is uncomfortable for a line that measures yield at the stringer.
When running dual cure modules, we operate the thermal cycle between 140 and 160 °C, ensuring the shaded adhesive under the ribbon finishes crosslinking while maintaining consistent thermal transfer across the entire string area.
Dual cure also changes what you buy. Suppliers now offer acrylic UV adhesives and epoxy or silicone thermal adhesives side by side, because different routes need different cure paths.
Where the cure stops being visible
Four things decide whether the joint is real, and none of them can be judged by eye:
- Dispensed volume, which drifts with viscosity, needle wear and pause time.
- Dot position, which moves with cell registration rather than with the head.
- Lamp output, which decays long before it fails, and unevenly across the array.
- Ribbon shadow, fixed by the product and invisible to every sensor on the line.
Each of these has a cheap proxy and an expensive surprise. A bead that looks correct and is short on dose passes every visual check and fails in the chamber, with the failure pinned on the encapsulant because that is where it becomes visible. That is why this argument moved from chemistry to evidence.
What the control plan carries
The control plan is where a process becomes repeatable, and this material needs three records no supplier will hand you.
What the lamp has to prove
A radiometer reading taken in the bead plane, logged per shift, catches lamp decay before a customer does. Conversion measured by FTIR before and after cure, or residual exotherm by DSC, turns a visual judgment into a trendable number. Then a pull test on the real ribbon, aged, reported as a distribution instead of a pass mark, because the tail is what fails a project and the median never moves enough to warn you. None of it is exotic equipment, and all of it fits in a shift log.
Forty to fifty suppliers and a price that keeps falling
Price followed the supplier count down. Public figures put the material at RMB 500 to 1,000 per kg in 2023, RMB 300 to 500 in 2024, and below RMB 300 now, with the same source expecting below RMB 100 per kg by the end of 2025. Those are published ranges and not quotations, and no brand is attached to them.
Take the top of each band and the fall is more than two thirds in two years. For a buyer the slope matters more than the level: a material losing price that fast has not been differentiated on performance, so lock the specification now, while suppliers still run your test.
Two sourcing habits follow. Qualify a second source on your own method, because two drums that pass the same viscosity check can still differ in dose response. And keep requalification cost visible: a change that saves a few percent per kilogram and costs a week of line time plus a retest is not a saving.
BC is a different job from the same bottle
Back contact puts both polarities on the rear face, alternating, so a ribbon crossing a finger of the other polarity needs electrical separation rather than positioning. The usual practice is to screen print the insulating pattern, dots or strips, on the cell side, cure it, then string. The requirements land close to the opposite of a positioning bead: hard, highly insulating, printable at speed, and able to take a short thermal shock above 200 °C if a weld follows.
One line on chemistry, because it explains the buying rather than the physics: positioning beads are mostly acrylic, insulating layers mostly epoxy based. That is why one catalog carries both, and why consolidating to a single SKU usually leaves half your volume on the wrong grade.
BC also rewards low temperature interconnect. Single sided welding puts asymmetric stress into the cell and bows it, so a room temperature cure is an advantage rather than a convenience. That 200 °C figure and the print sequence come from the materials review cited at the end.
Where these numbers come from
Every figure here comes from two Chinese language industry articles. The first, a review of PV UV adhesive published in February 2025, supplies the supplier counts, the viscosity, thixotropy, cure, transmittance, strength, heat and reliability figures, and the price bands. The second, a materials review of UV adhesive in 0BB and BC modules, supplies the three interconnect routes, the route positions of the named cell makers, the dual cure note and the BC insulation practice.
Three caveats belong next to those numbers. The property values are described in the source as common industry expectations rather than clauses of a standard, so treat them as the start of a purchase spec, not a test report. Transmittance depends on bead thickness and has to be measured at yours. The 300 °C for 5 s figure is conditional on welding after dispensing.
The supplier count is a February 2025 snapshot and moves monthly. The forecast below RMB 100 per kg is the source expectation, not a quotation from any supplier. No market size appears here because neither source gives one. Test names such as UV60 and DH1000 are industry shorthand; the chamber sequence comes from the module standard your customer cites, and the module reliability test list is the place to match each shorthand to a clause.
Final thoughts
The material stopped being the hard part somewhere around the fortieth supplier. What still separates two lines running the same drum is evidence: a dose record at the bead plane, a conversion number, a pull distribution after damp heat. Write those into the control plan before the next price cut, because a cheaper adhesive with no cure data is the most expensive one on the market.
FAQ
Q: Can a 0BB line run with no adhesive at all?
Yes, on a film route: a carrier or skin film presses the ribbon onto the cell and alloying happens at lamination, so nothing is dispensed. The trade is film cost, and the ribbon can be thinner because the film carries it.
Q: Is screen printing faster than piezo valve dispensing?
For a full pattern, usually yes, which is why printing appeared on 0BB lines: one pass beats a nozzle visiting every point. It needs a stiffer paste in the 20,000 to 40,000 mPa·s band, so the gain is takt rather than flexibility.
Q: How do you know the adhesive under the ribbon cured?
You cannot see it. Measure dose in the bead plane, use a dual cure formula that finishes on laminate heat, and confirm with an aged pull test on the real ribbon. The visible bead says nothing about the strip carrying load.
Q: Does the adhesive really have to survive 300 °C?
Only if the weld comes after dispensing, where the bead sees a short reflow. Weld first and the requirement becomes long dwell at hotspot temperature without material failure. Ask for the test that matches your sequence.
Q: Can one adhesive cover both 0BB positioning and BC insulation?
Rarely. A positioning bead wants speed, toughness and transparency; an insulating layer wants hardness, insulation and printability, plus a short thermal shock above 200 °C if a weld follows. That is why catalogs list acrylic and epoxy grades side by side.
Q: Why is the price falling so fast?
Forty to fifty suppliers competing on a specification most buyers have not written down. When performance is hard to compare, price becomes the comparison, and publishing your own test method is the cheapest way to stop that.
Q: What fails first in damp heat?
The joint interface, and the bond between a cured adhesive and the encapsulant. Residual acid or ionic content makes it worse on either chemistry. A laminated coupon beats a cured disc as a screen.
Q: Is there an official standard for these figures?
Not for the material itself. Viscosity, thixotropy, cure, transmittance and strength are industry common ranges, while reliability follows the module standard your customer cites. Write the method into the spec so two suppliers answer the same question.
We supply single and double chamber solar panel laminator machines with oil-heated or electric heating platens to control thermal cure and encapsulant flow on 0BB lines. Send us your drawings, module stack, or test samples, and our engineering team will evaluate thermal profiles and cycle parameters for your bill of materials.